# 4. DroneCAN interface
This page is about DroneCAN related details such as interface, supported features, parameters, configuration and usage examples and software versions. For general information please refer to the 1. General page, for hardware related details including wiring examples please refer to the 2. Hardware page.
This section is related to the latest released version of the software.
# 4.1. DroneCAN interface
This node interacts with the following messages:
| № | type | message |
|---|---|---|
| 1 | publisher | uavcan.equipment.air_data.RawAirData (opens new window) |
| 2 | publisher | uavcan.equipment.power.CircuitStatus (opens new window) |
Besides required and highly recommended functions such as NodeStatus (opens new window) and GetNodeInfo (opens new window) this node also supports the following application-level functions:
| № | type | message |
|---|---|---|
| 1 | RPC-service | uavcan.protocol.param (opens new window) |
| 2 | RPC-service | uavcan.protocol.RestartNode (opens new window) |
| 3 | RPC-service | uavcan.protocol.GetTransportStats (opens new window) |
# 4.2. DroneCAN Parameters
The list of parameters is shown in the picture below:
| № | Param name | Description |
|---|---|---|
| 0 | ID | You should manually choose the node ID. On the bus, a few nodes with the same ID should not exist. |
| 1 | airspeed_enable | 0 - disable data publication, 1 - enable |
| 2 | airspeed_pub_period | Period of message publication |
| 3 | airspeed_measurement_period | Period of data measurement |
| 4 | airspeed_calibration_offset | The published differential pressure = measured pressure + this offset |
| 5 | airspeed_calibration_request | Automatic calibration request. See this feature description for details. |
| 6 | enable_5v_check | Set ERROR status if 5V voltage is out of range 4.5 - 5.5 V |
| 7 | enable_vin_check | Set ERROR status if Vin voltage is less than 4.5 V |
| 8 | name | If specified value != 0, use custom node name. There are no custom names yet, but it might be extended if you need it. |
# 4.3. Getting started (bench test)
Before mounting on a real vehicle, especially when using the node for the first time, it is recommended to test the node and perform configuration on a bench using gui_tool (opens new window). This utility allows to easily use the full functionality of the node.
The following checklist allows you to test most of the features and configure the most important parameters.
Step 1. Connect the node properly to a sniffer. Initially, when there is no command, the node goes into STANDBY mode and LED should blink with blue color
The simplest connection scheme just for bench testing and configuration is shown below.
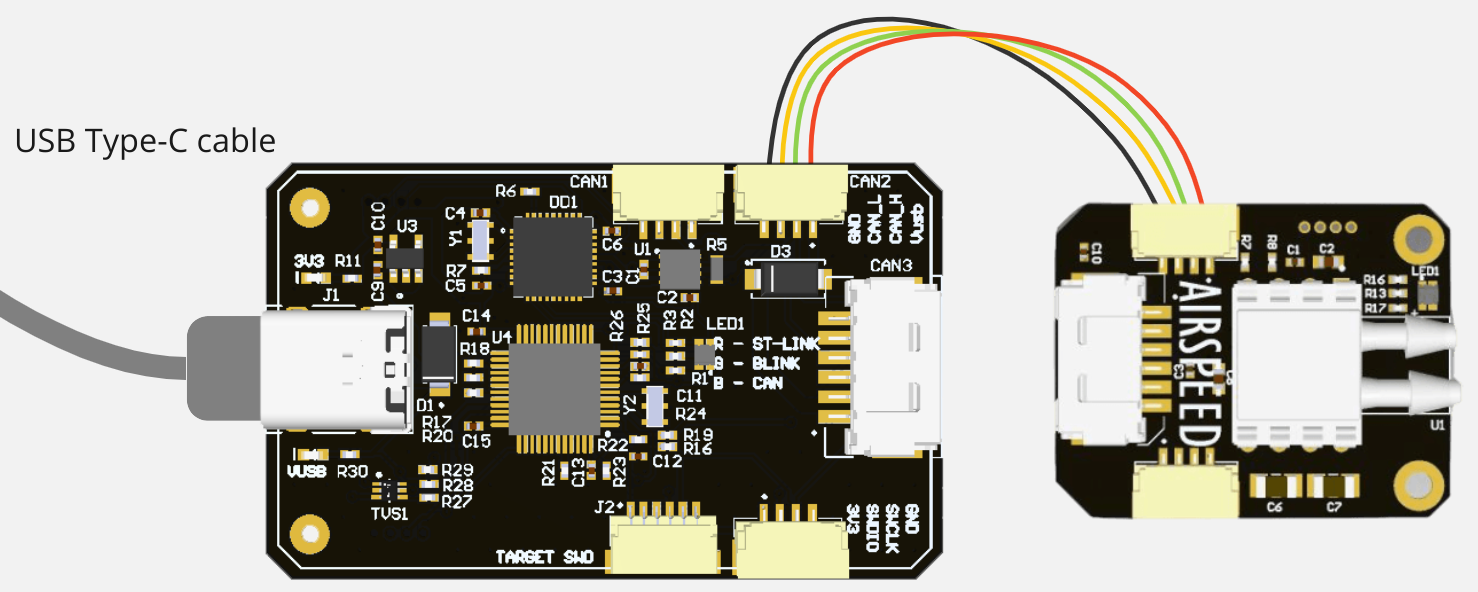
When you mount the device to your CAN-network you may want alternative connection of the sensor. Check hardware docs for other examples.
Step 2. Open gui_tool and set the local node ID. The node should send data and respond to GetNodeInfo
Open gui_tool and check that the node publishes some data like NodeStatus and GetNodeInfo. You can quickly press 2 times on the node in Online nodes list. You should be able to see additional information such as node name, software version, UID, etc.
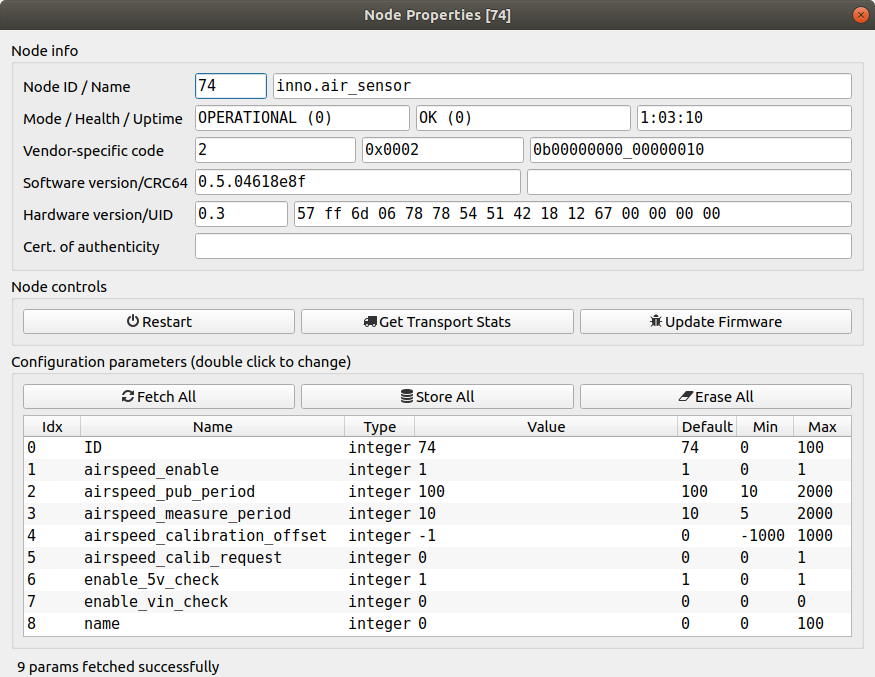
The node should respond with the software version that suits you (probably it should be the latest available stable version).
If your node doesn't send
GetNodeInfoit probably means that your gui_tool is still in anonymous mode. Apply local node ID.
Step 3. Configure the node ID, then reboot it. ID value should be updated.
Select the node ID that fits your CAN-network without ID-collision.
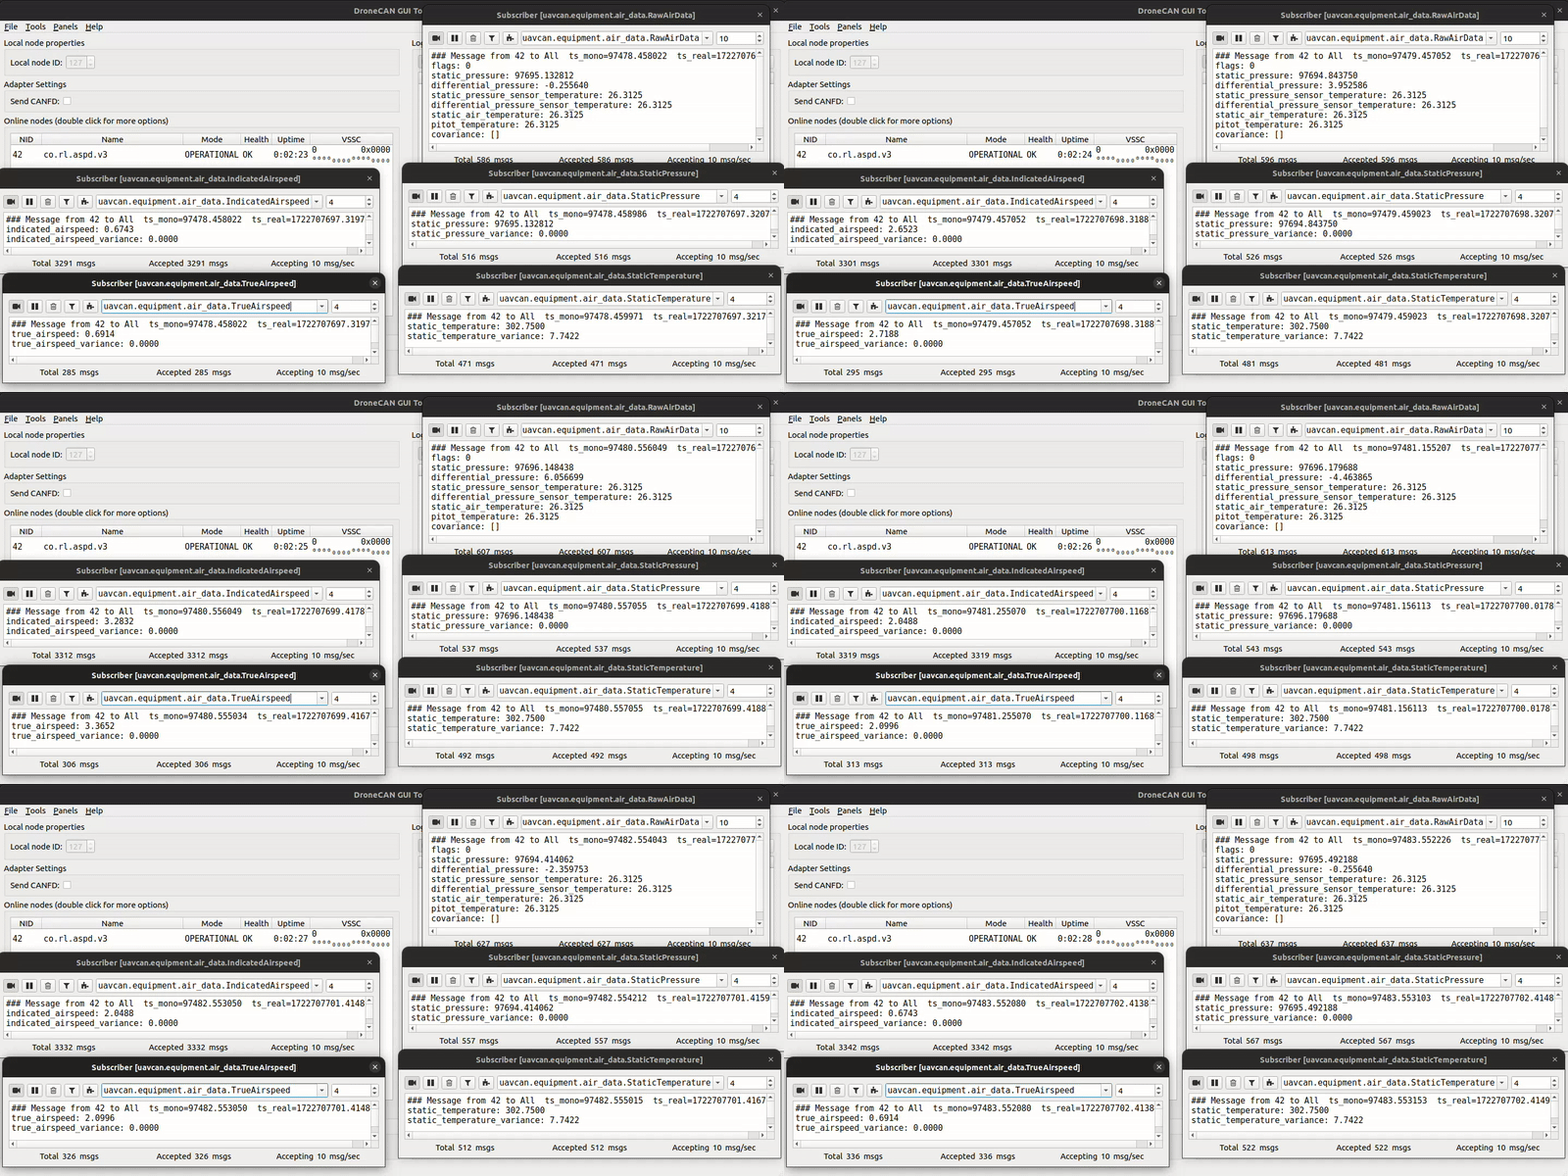
Step 4. Open subscriber panel. The node should publish RawAirData.
Below you can see an example of a message when a device is on a table and there is no wind.
You can create a real-time plot with raw sensor data. Here it is:
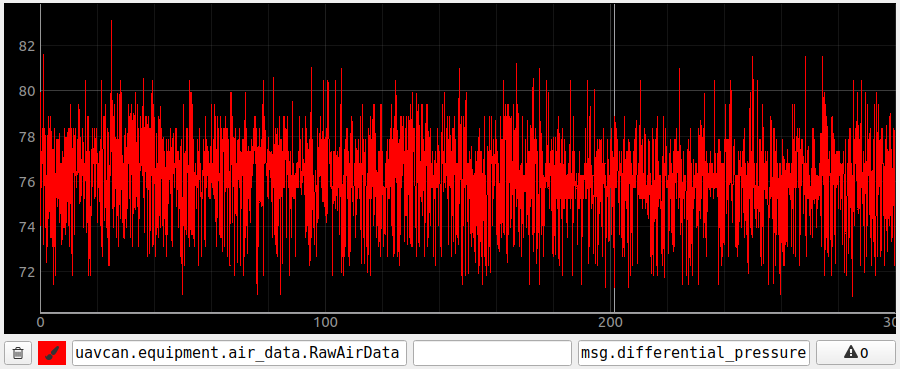
As you can see on the plot, the measurement has an offset. Here it is ~76 Pascal. Although this offset may lead to wrong airspeed estimation on the autopilot level, there are few ways how can you take it into account. See 5.2. Calibration for details.
Step 4. Calibrate the node using gui_tool. Published differential pressure should be close to zero.
This step is optional if you are going to calibrate the sensor on the autopilot side.
Calibration might be started using gui_tool. The alrorithm is following:
- Open a
Node Propertieswindow (the same as on picrure in 6. Parameters) - Set
airspeed_calibration_requestparameter to 1 - The node will go ibto
INITIALIZATIONmode for 10 second. You will see ib on main window - When a node go into
OPERATIONmode, you need to pressStore allbutton to save a calibration parameter. - (optional) Reboot the device to be sure that the calibration offset is saved successfully.
The calibration is done and device is ready for usage.
# 4.4. PX4 integration
The node has been tested multiple times on the VTOL application with autopilot based on PX4 (v1.12 with small fix and v1.13).
WARNING
PX4 v1.12.* usage issue!!! PX4 versions 1.12.* have a bug with wrong filter settings for DroneCAN differential pressure sensor reported in this issue (opens new window). It is recommended to use a newer 1.13 version where this bug was fixed.
4.4.1. PX4 Parameters
Normally, to use it with your PX4-based Autopilot you need to set up the following parameters:
UAVCAN_ENABLE,UAVCAN_SUB_DPRES(since 1.13.1),ASPD_DO_CHECKS(recommended, but is not necessary),SENS_DPRES_OFF(this value is added to every differential pressure measurement before airspeed estimation; PX4 calibration process automatically write to this parameter)
4.4.2. QGC node monitoring
Typically, during the first usage, it is recommended to check this node using MAVLink console by typing few simple commands:
uavcan statusallows you to see the list of online nodes. You should be able to see this node.listener differential_pressurereturns the raw value of the sensoruorb top differential_pressurereturns the publish rate of the sensorlistener airspeedwill output the airspeed estimated by this node
4.4.3. Calibration using QGC
As in said in 5.2. Calibration there are 2 ways of calibration process. Here is described how to perform calibration of this node using QGC.
To perform calibration on the sensor side from QGC you should type:
uavcan param list 74- check is calibration feature is supporteduavcan param set 74 airspeed_calib_request 1to start calibration- wait 10+ seconds
uavcan param save 74- to save new calibration parameters.
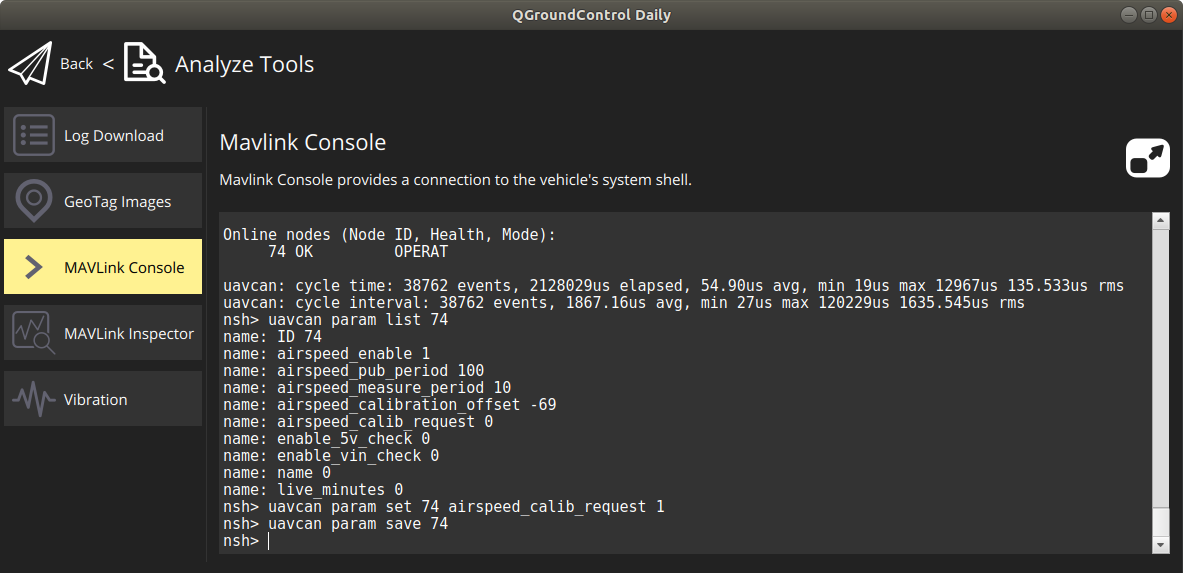
Here 74 is our node id. It has a calibration offset -69.
After that, you need to manually write non zero value to SENS_DPRES_OFF parameter.
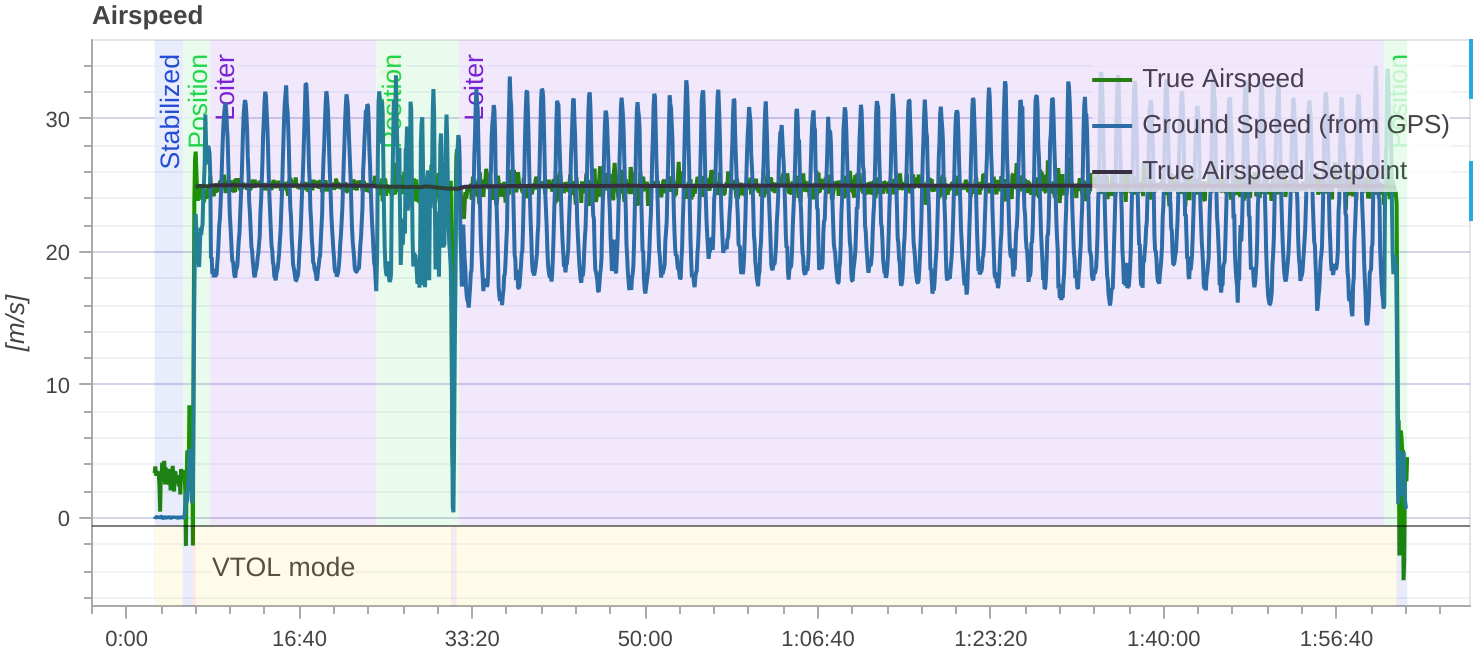
4.4.4. Flight log example
Here you may see the screenshot from one of the flight logs. This is a flight in FW mode for 2 hours with average speed 25 m/sec and wind ~7 m/sec.
# 4.5. Software versions
History of all releases and changes related to the node:
| Version | Date | Description |
|---|---|---|
| v0.4.5_65aa32d (opens new window) | Feb 17, 2022 | Add circuit status, filter and automatic calibration |
| v0.3.0_04866c1 (opens new window) | Apr 05, 2021 | First public release |