# 4. RaccoonLab CAN-Sniffer usage
Here is a comprehensive guide on how to use the RaccoonLab CAN-sniffer with different levels of applications. It starts from very basics and goes to the highest level of usage. Each section is independent, so you can skip what you don't need.
The guide is suitable for Linux and Windows (MacOS in process).
# 4.1. Connection example diagram
You have 2 options on how to connect a CAN-node to the RaccoonLab sniffer: UCANPHY Micro (JST-GH 4) and 6-pin Molex.
UCANPHY Micro is recommended for bench testing with low-power devices such as Mini v2 node without a load, airspeed, gnss, etc. This connection is simple and it delivers power to the device, so you don't need to use an external power source. An example of such connection is shown below:
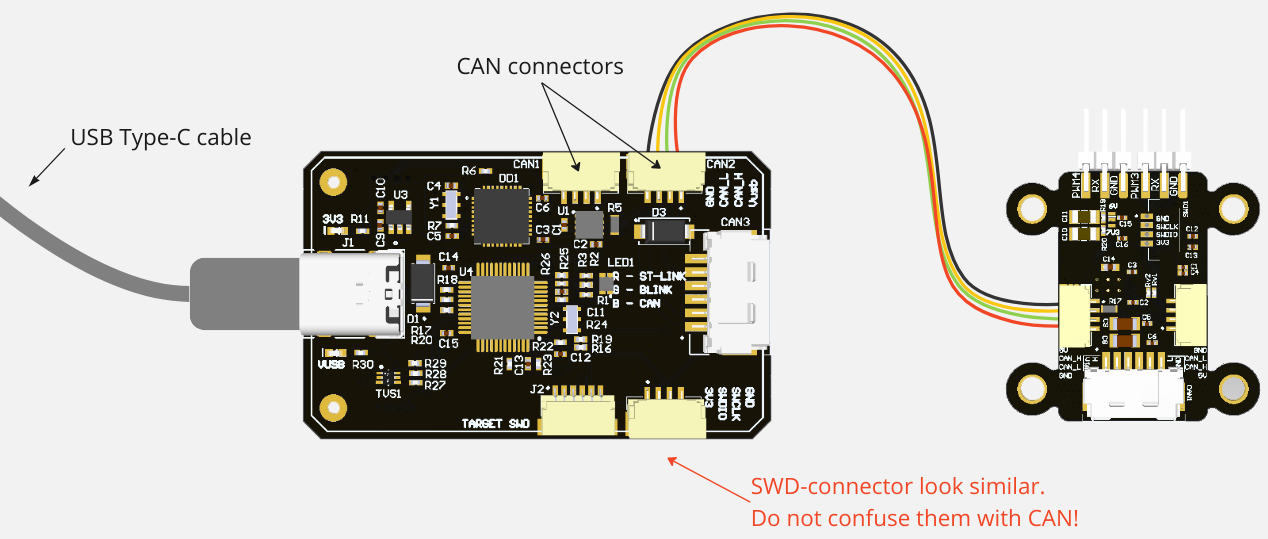
Alternativelly, you can use 6-pin Molex. It doesn't deliver power from RaccoonLab sniffer (=PC) to the device. Please, check the hardware page for details.
# 4.2. Low level - pyserial
TIP
Normally you don't need to use CAN-sniffer with pyserial. The following instructions may only be useful for low-level development or debugging. For details, please check pySerial docs (opens new window).
RaccoonLab CAN-Sniffer is a USB-CAN adapter, so you can interact with it via serial port.
At the beginning the RaccoonLab CAN-sniffer sends nothing. You have to initialize it with a sequence of commands: set speed and open channel.
Then you can send or receive CAN frames. The CAN-frame format is the following:
| Start byte | ID | Size | Payload | End byte | |
|---|---|---|---|---|---|
| 1 | 8 | 1 | 0-8 | 1 | |
| 'T' | '\r' |
Example of CAN-frame: "T107D5614806000000010255BD\r"
In the end it is expected to close the device by sending a specific command.
An example of code for Linux from tools/nodes/sniffer/pyserial.py (opens new window) is shown below (for Windows you just need to change /dev/ttyACM0 to COM4 or similar):
#!/usr/bin/env python3
import serial

CMD_EMPTY = b'\r'
CMD_CLOSE_CHANNEL = b'C\r'
CMD_SET_SPEED = b'S8\r'
CMD_OPEN_CHANNEL = b'O\r'
CMD_CLEAR_ERROR_FLAGS = b'F\r'

with serial.Serial("/dev/ttyACM0", 1000000, timeout=1) as ser:
    commands = [CMD_EMPTY,
                CMD_CLOSE_CHANNEL,
                CMD_SET_SPEED,
                CMD_OPEN_CHANNEL,
                CMD_CLEAR_ERROR_FLAGS]
    for cmd in commands:
        # Skip wait for ACK part here for simplicity
        ser.write(cmd)
        print(f"Send {cmd}, recv: {ser.read(1)}")

    can_frame = ""
    for _ in range(300):
        byte = ser.read(1)
        can_frame += byte.decode('utf-8').replace('\r', '\\r')
        if byte == b'\r':
            if can_frame[0] == 'T':
                print(f"recv CAN-frame: {can_frame}")
            can_frame = ''

    ser.write(CMD_CLOSE_CHANNEL)
The script opens a channel, receives and prints a few CAN frames, then closes the channel and exits.
# 4.3. Middle level - PythonCAN
TIP
The notes below can be useful for raw CAN-bus debugging or when you use a device for custom CAN-protocol. If you are going to use RaccoonLab CAN-sniffer with Cyphal or DroneCAN, most probably you can skip this section as well and go to the next ones. For details, please check python-can docs (opens new window).
The python-can (opens new window) library provides CAN support for Python. It supports different hardware devices.
- With RacconLab CAN-sniffer we recommend using slcan ASCII protocol (CAN over Serial / SLCAN) (opens new window). Since it directly uses a serial port, the interface works on both Linux and Windows. The disadvantage, though, is that this interface only support using a single process for the serial port.
- For Ubuntu users, SocketCAN (opens new window) can be a better alternative because it allows running multiple processes for a single interface. For example, you can run a few nodes, Yakut and Yukon simultaneously.
An example of code for Linux from tools/nodes/sniffer/python_can_slcan.py (opens new window) is shown below:
import can
with can.Bus(interface='slcan', channel='/dev/ttyACM0', ttyBaudrate=1000000, bitrate=1000000) as bus:
    for _ in range(10):
        msg = bus.recv()
        print(msg)
The script simply receives and prints a few CAN frames.
# 4.4 High level - Cyphal
There are a few tools to interact with Cyphal devices:
- pycyphal (opens new window) python package,
- Yakut (opens new window) cli,
- Yukon (opens new window) gui.
All of them are designed to work with different transport layers (CAN, UDP, serial) and different platforms (Linux, Windows, MacOS).
Let's prepare everything before working with Cyphal.
1. Preparation
In general, you need to setup DSDL and transport config.
Although you can hardcode all configs in your pycyphal script in a similar way as we do with pyserial or pythonCAN, by the design it is recommended to move your DSDL and transport config to a separate script that sets the environment variables. This approach allows to easily reuse your application in different platforms and with different transport layers.
To start work with RaccoonLab CAN-sniffer, you need to configure the following environment variables:
| Environment variable | Meaning |
|---|---|
| CYPHAL_PATH | Path to DSDL. Let's use the default:$HOME/.cyphal |
| UAVCAN__NODE__ID | The application node identifier |
| UAVCAN__CAN__IFACE | CAN iface name |
| UAVCAN__CAN__BITRATE | Arbitration/data segment bits per second |
| UAVCAN__CAN__MTU | Maximum transmission unit: 8 for classic CAN |
- Let's clone public regulated data types into
.cyphalfolder:
mkdir -p ~/.cyphal
cd ~/.cyphal
git clone https://github.com/OpenCyphal/public_regulated_data_types.git
git clone https://github.com/Zubax/zubax_dsdl.git
git clone https://github.com/DS-015/ds015.git
- Let's create a setup script:
setup.sh script for Linux (from tools/nodes/sniffer/setup.sh (opens new window)):
#!/bin/bash
export CYPHAL_PATH="$HOME/.cyphal/zubax_dsdl:$HOME/.cyphal/public_regulated_data_types/"
export UAVCAN__NODE__ID=127
export UAVCAN__CAN__IFACE="slcan:/dev/ttyACM0@1000000"
export UAVCAN__CAN__BITRATE="1000000 1000000"
export UAVCAN__CAN__MTU=8
The same setup.ps1 script for Windows (from sainquake/setup.ps1 gist (opens new window)):
$env:CYPHAL_PATH="C:\workspace\pycyphal\demo\public_regulated_data_types"
$env:UAVCAN__NODE__ID="127"
$env:UAVCAN__CAN__IFACE="slcan:COM7@1000000"
$env:UAVCAN__CAN__BITRATE="1000000 1000000"
$env:UAVCAN__CAN__MTU="8"
WARNING
Add MacOS example here...
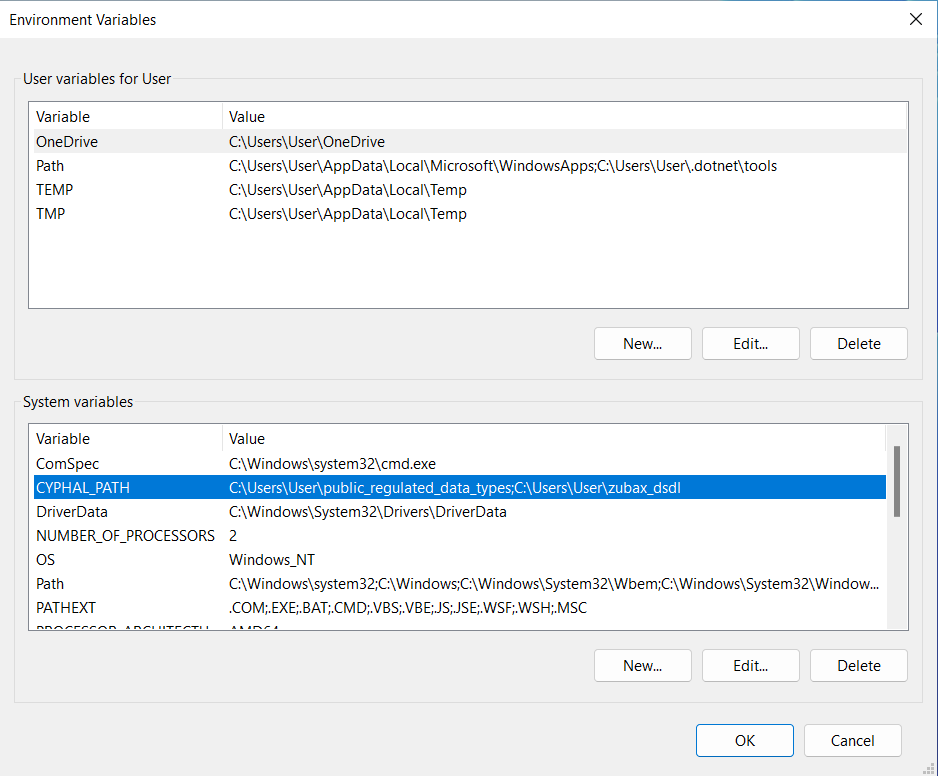
- (Optionally) Add the setup of these environment variables to
~/.bashrcon Linux or to theEnvironment Variableson Windows
2. Pycyphal
TIP
For more details, please check the pycyphal docs (opens new window)
You should always source the setup script before running a pycyphal script.
The simplest pycyphal script (from tools/nodes/sniffer/cyphal.py (opens new window)) that just listen for heartbeat is shown below:
#!/usr/bin/env python3
import asyncio
import pycyphal
import pycyphal.application
import uavcan.node
import uavcan.node.Heartbeat_1_0

async def main():
    node_info = uavcan.node.GetInfo_1_0.Response(
        uavcan.node.Version_1_0(major=1, minor=0),
        name="co.raccoonlab.example"
    )
    node = pycyphal.application.make_node(node_info)
    node.heartbeat_publisher.mode = uavcan.node.Mode_1_0.OPERATIONAL
    node.start()

    heartbeat_sub = node.make_subscriber(uavcan.node.Heartbeat_1_0)
    for _ in range(10):
        transfer_from = await heartbeat_sub.receive_for(1.1)
        print(transfer_from[0] if transfer_from is not None else None)

asyncio.run(main())
Another simple example tested on Windows: sainquake/py.py (opens new window)
3. Yakut CLI
TIP
For more details, please check the OpenCyphal/yakut repository (opens new window)
pip install yakut
Run shell script and then yakut monitor
source setup.sh
y mon
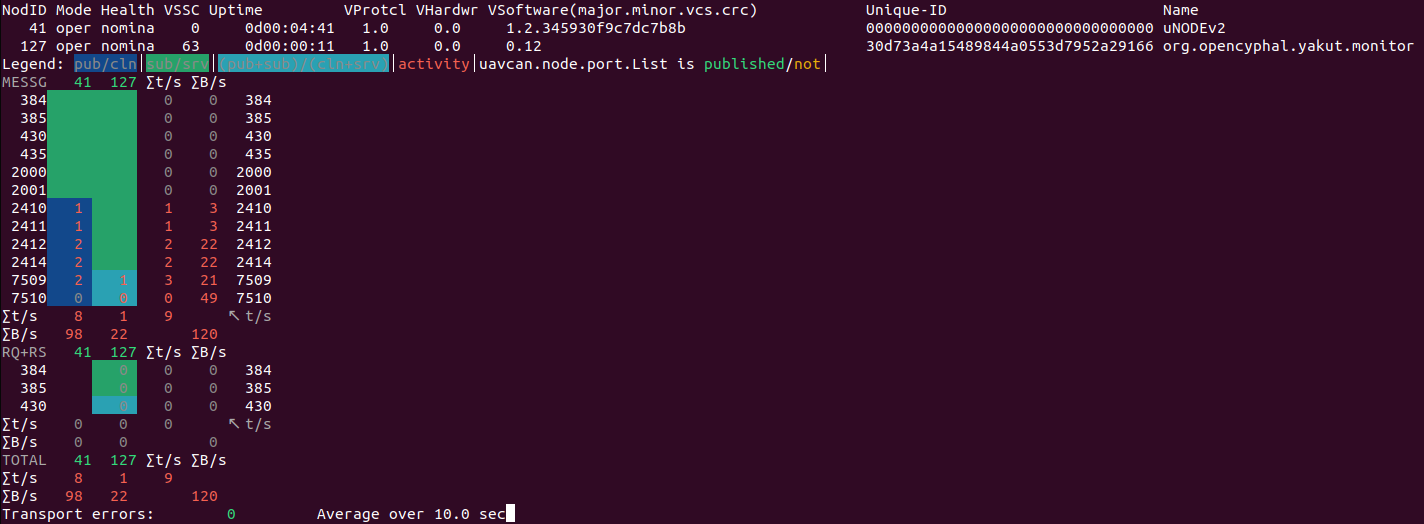
Here you can see a basic online nodes information:
- Hertbeat (opens new window) related things: id, mode, health, vssc, uptime
- GetInfo (opens new window) related things: protocol, hardware and software versions, UID, name
- port.List (opens new window) related things: subjects published by this node, subjects that this node is subscribed to, RPC-services.
You can request all existed parameters of the node with y rl [OPTIONS] NODE_IDS command, for example:
$ y rl 20

[example.integer, example.string, system.name, uavcan.node.description, uavcan.node.id, uavcan.pub.feedback.id, uavcan.pub.feedback.type, uavcan.sub.setpoint.id, uavcan.sub.setpoint.type]
You can read or modify a register with command y r NODE_IDS REGISTER_NAME [REGISTER_VALUE_ELEMENT]. For example:
$ y r 20 uavcan.node.id

20
You can execute a command using ExecuteCommand RPC-service (opens new window) with command y cmd [OPTIONS] NODE_IDS COMMAND [PARAMETER]. For example, you can restart the node:
y cmd 20 restart -e
You can subscribe or publish a subject with y sub [OPTIONS] [SUBJECT] and y pub [OPTIONS] SUBJECT FIELDS [SUBJECT FIELDS].
For detaield usage examples and additional features of the yakut cli,
please type y --help or refer to the OpenCyphal/yakut docs (opens new window).
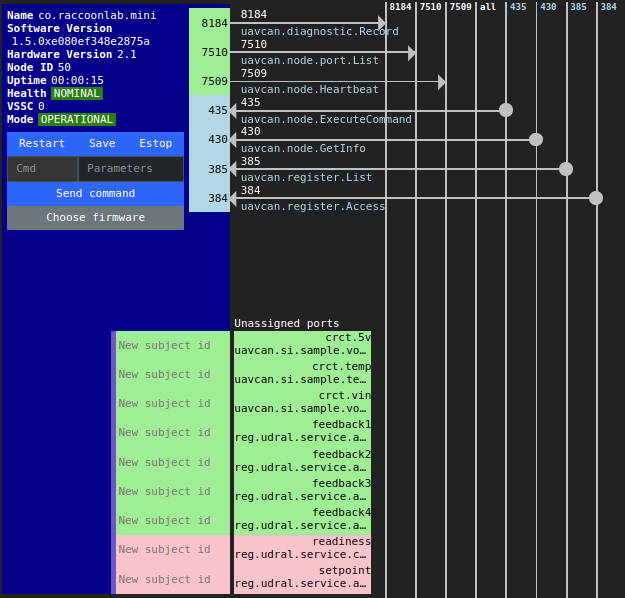
4. Yukon GUI
TIP
Details: github.com/OpenCyphal/yukon (opens new window). While Yukon is usable, it is in the alpha stage and is known to contain bugs.
- Download the latest executable from OpenCyphal/yukon/releases (opens new window)
- Run
chmod +x ./Downloads/Yukon-linux-x86_64 - Source the setup script
- Execute
./Downloads/Yukon-linux-x86_64
# 4.5 High level - DroneCAN
WARNING
pydronecan is in process
You can use gui_tool (opens new window) for DroneCAN applications.
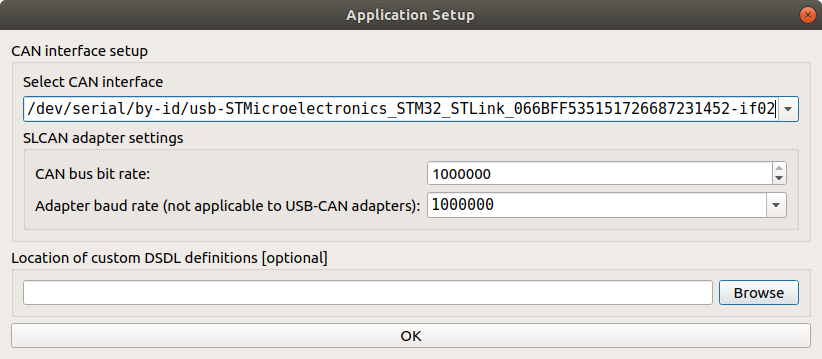
In the Application Setup menu you need to set 1000000 to both can bus and adapter baud rates.
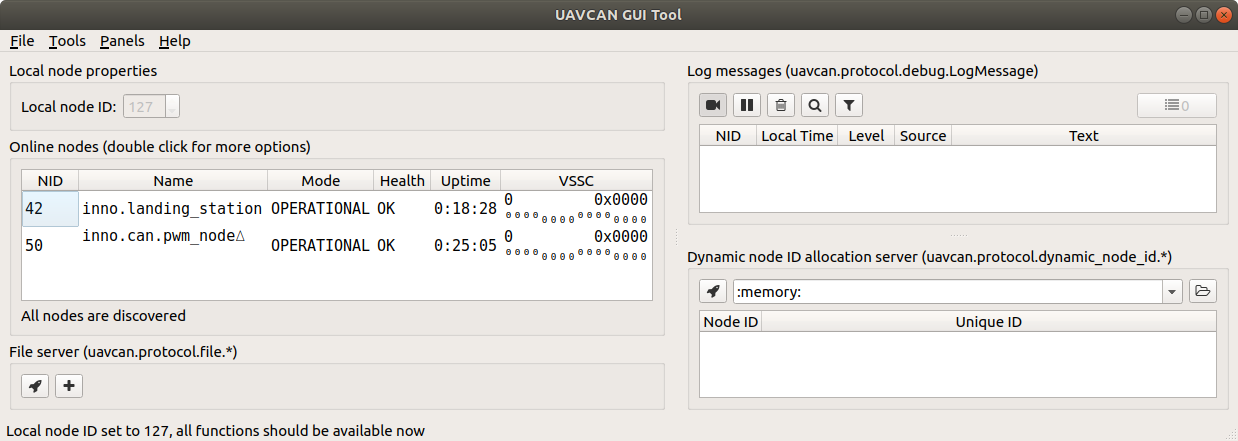
After that you will get following window:
