# 3. Cyphal interface
This page is about Cyphal related details such as interface, supported features, registers, configuration and usage examples and software versions. For general information please refer 1. General, for hardware-related details, including the connection example scheme, please refer to the Hardware page: Hardware.
# 3.1. Cyphal interface
This node interacts with the following data types:
Common for any node
| № | Type | Message | Rate |
|---|---|---|---|
| 1 | pub | uavcan.node.Heartbeat (opens new window) | 1 Hz |
| 2 | pub | uavcan.node.port.List (opens new window) | 0.2 Hz |
| 3 | RPC-service | uavcan.node.GetInfo (opens new window) | |
| 4 | RPC-service | uavcan.node.ExecuteCommand * (opens new window) | |
| 5 | RPC-service | uavcan.register.List (opens new window) | |
| 6 | RPC-service | uavcan.register.Access (opens new window) |
Here ExecuteCommand supports COMMAND_RESTART=65535, COMMAND_FACTORY_RESET=65532 and COMMAND_STORE_PERSISTENT_STATES=65530.
Circuit status service
Like any other RaccoonLab node, this node also supports the Circuit status service. It uses the following subjects:
| № | Type | Message | Topic name | Rate | Comment |
|---|---|---|---|---|---|
| 1 | pub | uavcan.si.sample.voltage.Scalar.1.0 | crct.5v | 2 Hz | Not provided in opensource firmware |
| 2 | pub | uavcan.si.sample.voltage.Scalar.1.0 | crct.vin | 2 Hz | Not provided in opensource firmware |
| 3 | pub | uavcan.si.sample.temperature.Scalar.1.0 | crct.dev_temp | 2 Hz |
LERGB LED service
It supports UDRAL interfaces. You should use only one interface at the same time.
The following interface is based on UDRAL:
| № | Type | Message | Topic name | Rate |
|---|---|---|---|---|
| 1 | sub | HighColor.0.1 (opens new window) | lights | set up by user |
# 3.2. Cyphal Registers
Beside the standard uavcan.*.<subject>.id and uavcan.*.<subject>.type registers related to
each subject, the node also have the following registers:
| № | Register | Note | Description |
|---|---|---|---|
| 0 | uavcan.node.id | Reboot required | Node ID |
| 1 | uavcan.node.name | Reboot required | Node custom name |
You can get the list of registers, read and write them using Yakut (opens new window) cli or Yukon (opens new window) gui.
# 3.3. Getting started (bench test)
Before mounting on a real vehicle, especially when using the node for the first time, it is recommended to test the node and perform configuration on a bench using Yakut (opens new window) cli or Yukon (opens new window) gui.
This section provides a step-by-step checklist to test most features and configure essential parameters.
# Step 1. Connect the Device
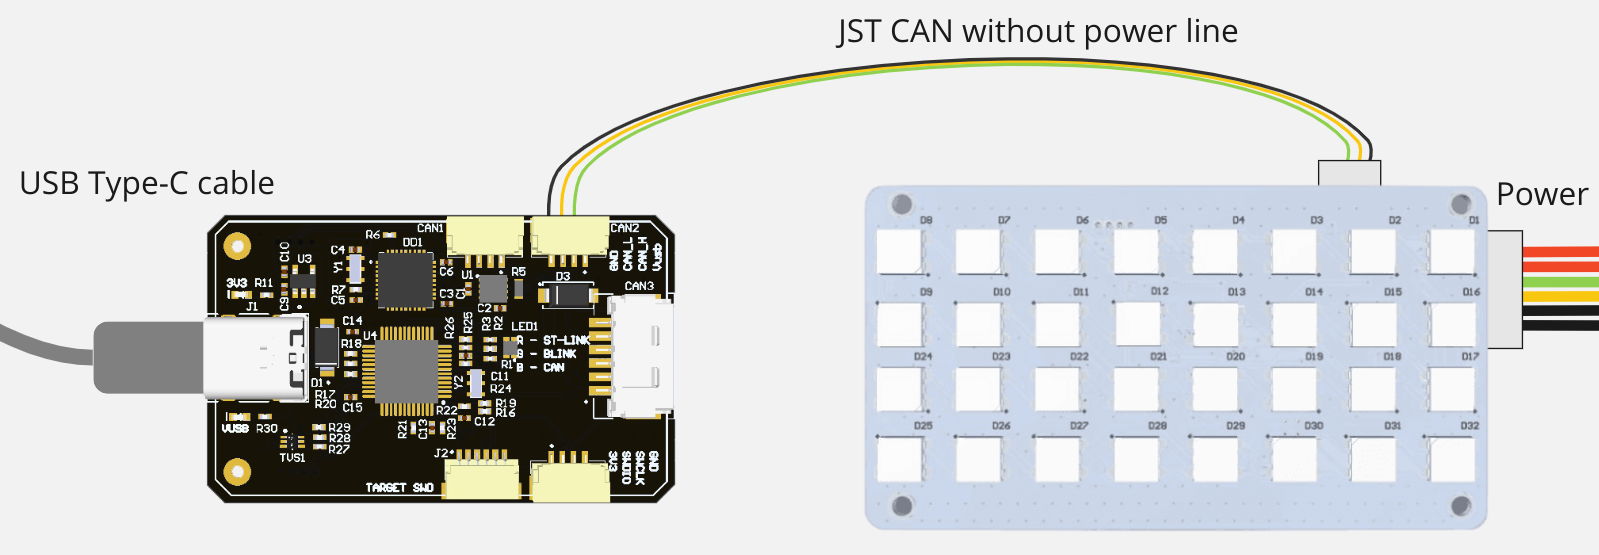
The simplest connection scheme just for bench testing and configuration is shown below.

However, the node may consume a lot of power when all 3 colors (red, green, blue) are enabled with the hightness brigtness, so it is recommended to use the following connection scheme where you power a node from an external source (up to 30V) to a Molex (6-pin) connector and connect the sniffer to the JST-GH 4-pin connector. The connection scheme is:
WARNING
Remove the 5V (red) line from the JST wire on the connection scheme below!

In progress: new version of the software will have automatic detection of the connection type. If you power from JST (5V), it will automatically reduce the brightness to reduce the power consumption, so it can be easily and safely used with any connection type.
# Step 2. Configure the Environment
For details about how to configure the environment, it is recommended to iether refer to the yukon (opens new window) and yakut (opens new window) instructions or to refer to our Cyphal usage instruction.
# Step 3: Monitor the Node
Assuming you have correctly connected the Cyphal node to a CAN sniffer and prepared the environment, you can now monitor node's status.
# Using Yakut CLI
Run the following command:
yakut monitor
You should see the output similar to the one shown below:

# Using Yukon GUI
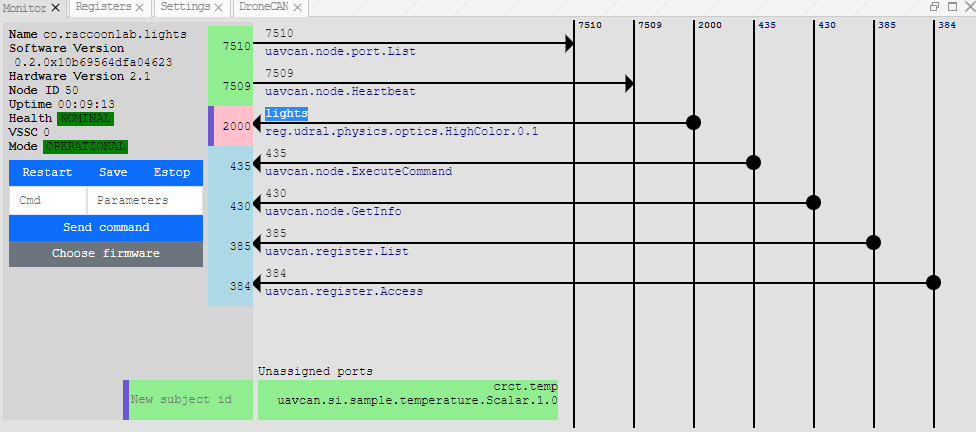
Alternatively, you can use the Yukon GUI to monitor the node. Simply launch the Yukon GUI and navigate to the Monitor window. An example of this window is presented below:

When monitoring, look for the LIGHTS node on the bus.
By default, its name should be co.raccoonlab.lights.
Note: Remember the node ID (number) of the GNSS node. While this guide uses 50 as an example in subsequent steps, you should use the node ID that corresponds to your setup.
# Step 4: Configure and Read the Data
# 1. Register Configuration
# 2. RGB LED Color send
# 3. Circuit Status Data Retrieval
Configure the ports:
y r 50 uavcan.pub.crct.5v.id 4006
y r 50 uavcan.pub.crct.temp.id 4007
y r 50 uavcan.pub.crct.vin.id 4008
Listen to the data:
y s 4006
# or
y s 4007
# or
y s 4008
Outputs Examples:
  timestamp: {...}
  volt: 5.10432243347168
  timestamp: {...}
  kelvin: 298.0
  timestamp: {...}
  volt: 4.712674140930176
# Step 5: Try Node Control Commands
Issue a restart command:
y cmd 50 restart
Note: Receiving Timed out while waiting for response from node 50 is expected, as the node restarts immediately.
Reset to defaults (Attention: registers configuration would be reset):
y cmd 50 factory
# 3.4. Ardupilot integration
WARNING
Ardupilot doesn't officially support Cyphal. It is expected to use the custom cyphal branch of ardupilot (opens new window).
1. RGB LED configuration
2. Verification
# 3.5. PX4 integration
WARNING
PX4 support is a "work in progress". It doesn't officilly support GNSS, magnetomer or barometer. It is expected to use the branch with few additional features (opens new window).
1. RGB LED configuration
# 3.6. Software versions
UAV Lights Cyphal software is open source. Check RaccoonlabDev/uav_lights_node (opens new window) if you want to customize it.
| Version | Description |
|---|---|
| v0.2.3 (opens new window) (Dec 27, 2023) | - Add external RGB LEDs init sequence - Add default external RGB LEDs color - Add support of UAV-Lights v2.2 (it is about new internal RGB LED) |
| v0.2.2 (opens new window) (Dec 27, 2023) | First Cyphal release for UAV Lights node v2.1 |